Pages

Showing posts with label crafts. Show all posts

Monday, May 14, 2012

Side Dish #24: Mother-Daughter Aprons!


My sister is an apron-loving kind of girl, so for her birthday and then for her daughter's birthday (back in FEBRUARY...yeah, i am kind of late!) I decided to make them some matching aprons!

For Mary's I copied my favorite apron...one that was from Japan. I loved how the straps criss-crossed so that if stayed up higher in the front.


my japanese one used buttons and then had separate straps to tie it... by accident :) I discovered an even better way...using D rings I was able to  use 2 long straps instead of having to use 4. 


I used bias tape to trim Mary's all the way around.


Lizzie got a little ruffle at the top and bottom of her apron. 
I used a small quick release clip as a fastener for the top, so they could adjust how long it was.

I meant to get pictures with them wearing it but forgot! :( 

Fun times...although I realized I need to do all my gift projects in the summer because it gets really stressful trying to find time to work on them during the school year!
This has been my year for reading. I have realized I don't have time to read and craft so I have to pick one or the other!


Sunday, January 15, 2012

Side Dish #20: Tea Wreath

I saw my sister post this one on pinterest so decided to make it for her as a gift for being such a wonderful hostess when we visited over christmas! The tutorial is found here.
It was so fun to make! I tried another way first but it really needs to have a cardboard ring to support the clothes pins! I only had to buy the clothes pins! I had a bunch of tea that I was happy to give to my sister who is NOT a coffee drinker (I guess they really do exist! :) )


Friday, December 23, 2011

Side dish #18: Subway Art

wow, happened upon this blog today, and I pretty much stopped everything I was doing to try it. (That is the beauty of christmas break and a napping baby!) So much fun. All you need is picasa and some fun fonts! I love Kevin and Amanda's fonts found here. Kind of like wordle, i guess, but I felt like I had more control over everything!

I got to work on a couple I can't share right now because they are presents :), but make one, print it, and stick it in a frame...that is one personal, yet VERY inexpensive gift!

Anyways, tonight I worked on one for Alex, it is a little different then the others because I only used one font, but I really like the way it turned out. Won't it be cute in his room! Then we can keep doing them throughout the years if we want!

So go check out this blog post found here to get great directions! Hope you are enjoying break as much as I am! :)


Wednesday, December 21, 2011

Side Dish #16: Paci Clip

Tonight I was working on another project, and because I had my sewing machine out, I decided to make Alex a new paci clip. Our pacis are too important to get lost or dirty when he drops them out of his mouth, so we like to make sure they are attached tightly to his body! :)
I think i have made two others, but after a while they are gross and dirty and it was time for a new one!
I found the little clip at Hobby Lobby, it is a suspender or mitten fastener. I looped the ribbon and sewed that on, then sewed on velcro on the other side. buy the sew on kind of velcro because the sticky back comes off pretty quickly, then reeks havoc on your sewing machine needle because of the gummy sticky stuff.
Anyways, tomorrow Alex will get a new, fresh paci clip to help him as he works on cutting those incisors!

Monday, December 5, 2011

Side dish #15: Paper Clip Earrings

This blog post found here was the find of a century...gifts for under $5...especially ones that take an evening to complete! I immediately fell in love with the paper clip earrings that looked gorgeous!
So I made my own...sitting on my couch...watching TV... a relaxing kind of craft! :)

aren't they kind of artsy and fun! :)

Side dish #14: Christmas Wreath

So I made another similar one found here, but experimented with some new flowers and did more christmasy colors! Tutorials for flowers are found here and here (kind of)
Excuse my camera...it is getting so old and takes terrible picture!


Wednesday, November 23, 2011

Side Dish #13: Felt Christmas Trees

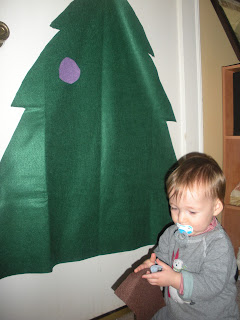
So on a rainy Sunday with a restless almost one year old, I decided to try out this felt christmas tree I found on pinterest. The original post is found here. I am not at all one for decorating before Thanksgiving, but I had just picked up the felt at michaels and was eager to make it! :) Michaels has large felt pieces for 4 dollars, and then using some more felt I bought, and other colors I already had, this was about a $5 project!
The original had ornaments with letters and such, but I was more into a 10 minute project so decided to focus on SHAPES this year with Alex...we can add letters later! :)
The creases on the big green felt made it easy to make an outline for the tree. I still need to attach the brown trunk on the bottom. I also need to figure out how to attach it better to the door. Alex tore it down just about as quickly as he took off the felt ornaments!

 Perfect Alex size!
(do not make fun of my star! I need to fix it!)

He doesn't really put ornaments back up, but he is certainly a pro at taking them off in record time!
I think that is what is making me nervous about putting a real tree up! :)

And suggestions for how to keep it up would be great! the 3M strips did not work! :(

Thursday, November 17, 2011

Side Dish #12: tutus

 Have you noticed I have been doing more crafts then cooking recently, not good. Hopefully I will be able to catch up over thanksgiving! But thanks to pinterest, I have been having fun doing some fun cheap crafts, like tutus! See the tutorial I followed here The crafts also have to be 30 minutes or less too because that is my attention span right now! :) Well, at the end of the 30ish minutes here was my final product! :)


Sunday, November 13, 2011

Side Dish #11: Fabric Flower Rings

So pinterest may be a waste of time because I keep discovering all these new blogs I want to read, but I love finding quick craft projects to release my inner craftiness with out using up all of my precious free hours (those are very few these days!). So when I happened upon these rings, I was so excited to try it out!
Thanks to scraps around my house and already having some ring bases from a failed project, this project cost me next to nothing! And it was so fun to make the flowers I made some hair clips too! :) Perfect stocking stuffers!
Check here for the tutorial!
I love big rings! :)

Side Dish #10: Infinity Scarf


I made this last week during the commercial breaks of The Sing Off! :) I started seeing all these infinity scarves popping up on facebook and then when i was with a friend at Joanns we happened upon this fun double sided fabric in the clearance section!
since it was double sided i didn't have to do much, i just tried to do a really little seam up both sides so that it looked more like it was curling in. i messed up a bit when i was attaching them together...trying to make it look as seamless as possible, but I think next time I can do it better! 
Fun addition to the wardrobe! 

Sunday, November 6, 2011

Side dish #9: Yarn Wreath

okay, so I saw this picture on pinterest and knew I wanted to try that! Of course it was not nearly as nice because I decided to just use up yarn i have, I now have this cute wreath...

Has a wonderful winter feel without being too christmasy! :) It was a great project to work on while watching a movie, and wrapping yarn around a foam wreath is the best brainless activity one can do on a tired Friday night!
Like the felt flowers? Here is another project that is tons of fun!

Side dish #8: DIY Ninja costume!

After mulling over a couple ideas for what Alex should be for Halloween, I finally went back to the original idea...NINJA.


While some people are super elaborate, i went really simple and cheap!
First go to your local target and buy a black sweatsuit...$8.00
Next, go through your fabric stash and get some black fabric...5 minutes $0
research how to make head wrap (pictures found here) ...10 minutes
then cut the fabric so you can make one long skinny piece, and two rectangles 5 minutes
sew (if necessary) 2 strips together to make one long piece, hem two rectangles 10 minutes
wrap long piece around body to create the "yukata" look of the front.... 2 minutes
tie head piece on child's head... 5 minutes
trying to make it more like a ninja's head piece...good luck trying to get your squirming child to be still!
give up and call it a day, because regardless, you have one pretty cute ninja wandering around your house! :)


Side dish #7: Pull-it-out Toy!

So Alex has discovered the joy of tissue boxes, wipes containers, napkins...anything you can pull out and destroy! As a way to help redirect him I made a alternative activity for him to play with! Thanks to pinterest, I was directed here for directions, and in an evening I was set!

You need:
An empty wipes container
scrap pieces of fabric.

I got really lazy as I cut out the pieces and didn't even worry about hemming them all!  I looked in my fabric stash for different scraps with different textures, sizes, and colors.
Cut them in to smaller pieces and STUFF into the wipe container. I have to sit there sometimes and help Alex get started, but he loves it! I tried at first knotting them together, but he was not a fan of that. He still takes each one out and tries to see if he can rip it! Adding their name to the front with some fun stickers also makes it quite exciting! :)

Sunday, September 4, 2011

Side Dish #6: Hanging Storage

I live in a small house so have to overcome my lack of space by using my wall space.
Thanks to Ikea I have been able to turn a pretty messy study room into a more efficient workspace for me...


not that it is any cleaner, but maybe more organized... I still need to put some cork boards I have in that empty wall space, but I love it! I love not having to put away my sewing machine because I need to set the table for dinner, and everything I need to sew, craft etc is right around me!

So, Last weekend, I decided that Will needed to get his coaching papers off of my dining room table and into a spot is still convenient for him. So I had just enough left over material from another wall pocket thing I had made to make him a little...your-paper-catch-all spot...
I cut out two rectangles, and then one little one for a pocket. I sewed the pocket on the front piece, then sewed the two main pieces together. I also sewed down the middle to make two main pockets, one for the notebook and one for other stuff... sew on some little loops to hang and you are done!
Easy afternoon project!


Yesterday I worked on the kitchen laundry bag I wanted to make for a while. It hangs perfectly behind the door, out of sight, but also makes those wet kitchen towels and such out of sight too! I had to do a little bit of adjustments to this one...I got the idea from my One Yard Wonders book, but theirs was really big so I wanted to shrink it a bit. Unfortunately the salad plate I used (instead of a dinner plate) made the hole a little too big...which of course I didn't realize until I had cut it out...
so I sewed a little addition to the bottom, sewed the sides together, added some hanging straps and finally, a way to get my kitchen laundry off of the kitchen counter! :)
Plus isn't this fabric so cheerful! I normally don't love yellow, but this was just to cute to pass up...plus I had a 50% off coupon...


Well, the last project for me for a while will be a sewing machine cover...oh and a bag. Then it is on to start on my list of Christmas presents! :) 

side note: There is a new One Yard Wonders book coming out in December! Check it out on Amazon here...just in time for Christmas! :)

Monday, August 1, 2011

Side Dish #4: Luggage tags

Okay, so the little mister and I went on a plane last week to go see his grandparents one last time before they head to Japan. I needed to mark my suitcase and his car seat that we were going to check in so I decided to make some luggage tags! The little things that make my day! :) I had actually made some name tags several months ago for Alex's diaper bag so that they would know it was his in the nursery at church Then I made some for his two cousins as well, but had to go back to the store to get new tags since I had no idea where my leftover one was!


You need to buy some self laminating luggage tags. I found them at hobby lobby and office depot...I am sure you can find them almost anywhere. On the tags check out to see how big they are. Then in microsoft office, open a text box that is just a bit smaller than the tag. I downloaded some fun fonts from here. They have a ton of REALLY cute fonts, also doodles, which is what I used for the little pictures. Print it out and follow the directions on the package to make your own unique luggage tags!

Sunday, July 3, 2011

Side Dish #3: Classic jumper for your little sweeties!

A couple weeks ago, my sister, Sarah, and I decided that our nieces needed some S&K originals to wear! So when Sarah came to visit we got to work. Many hours, a couple major oops (thank goodness for extra fabric) later, we finished! I had gotten this really fun book-- One-Yard Wonders. It has 101 sewing projects that use a yard or less of fabric. So we decided to make little jumpers for Julia and Lizzie.
Isn't it cute! We had more fun choosing out the buttons too!

 This is Julia's purple jumper and Lizzie has a pink one. The fun thing about it is that even in the fall they can add a little onesie underneath with some cute tights! They even have matching head bands! (Remember those felt flower headbands...found here)
If you love fun, fast projects get that One Yard Wonder book! It is so much fun, there are craft storage ideas,  toys, bags...I need to find time to sit down and make some more stuff!

Thursday, June 23, 2011

Side Dish #2: Felt flower headbands

I was reading through a magazine and happened upon a cute idea to make flowers! Of course, I can't make them for Alex, but have two nieces. Since the majority of fun crafts are for girls, I am happy to give the fruits of my craftiness to someone, and I am sure Alex is grateful that I don't make him that girly stuff...fun things for boys are a little harder to come by, although I did make him a cute tie earlier and will have to make a bigger one for the fall.

Anyways, I used the instructions found here from Woman's Day about how to make a brooch. But instead of putting a pin on the back I glued a hair clip and then attached the hair clip to one of those little elastic baby headbands. Of course mine doesn't look as perfect as the pictures, but it is cute enough... and goes perfectly with the dresses that Sarah and I made for them! :)


                                                                   Here is a close up...
Don't you want to go make some for all the little ladies in your life! Best of all it only costs a couple of dollars to make because two different colors of felt could make multiple flowers! Go have some fun!

Thursday, June 9, 2011

Side Dish #1: Hockey sticks and pucks!

Periodically I will have a 'side dish' to highlight a fun craft or to share a great book I read. Just because. I want to.

Anyways, several months ago I was at Joanns and found a fun little remnant of fabric that had hockey sticks and pucks all over it! So I had to buy it because my brother-in-law, Eric, is an avid hockey fan. I really had no idea what I wanted to do with it, just that I had to make something from it.

Let's back track a bit, I love experimenting with a variety of crafts, sewing was one that I had done a while back, but in the last two or three years my sewing machine had collected dust because I didn't know what to do. Enter babies, and a whole new world of sewing projects opened up to me! My Spring break was filled with crafting toys and ties for babies.

Okay, back to the hockey themed fabric. I had some fun making some stuffed toys for the babies (besides my son I have two nieces who are all born within two months of each other!) then it hit me. Lizzie needed an early start in her hockey skills, so why not make her a stuffed puck and sticks so she could get some practice in with dad without her mom worrying about the damage she could do to her surroundings! And that is what I did this morning! (Can I say again how much I love summer vacation!) It was a fun, quick little project. Guaranteed, the hockey sticks don't look exactly like real ones, but at least Lizzie will be familiar with how to hold a hockey stick and how to hit a puck so that when she gets to hold a real one she will make her daddy proud! :)